Contact online

This is default featured slide 1 title

Go to Blogger edit html and find these sentences.Now replace these sentences with your own descriptions.

This is default featured slide 2 title

Go to Blogger edit html and find these sentences.Now replace these sentences with your own descriptions.

This is default featured slide 3 title

Go to Blogger edit html and find these sentences.Now replace these sentences with your own descriptions.

This is default featured slide 4 title

Go to Blogger edit html and find these sentences.Now replace these sentences with your own descriptions.

This is default featured slide 5 title

Go to Blogger edit html and find these sentences.Now replace these sentences with your own descriptions.

Thursday, July 25, 2013

Free Flash Games For Your Website or Blog

DKDE || blogpemula2019.blogspot.com || okysetyakelana.blogspot.com 

HTML code contains more than 400 games, which is free to your website/blog, These games provided by www.freegaming.de .


To do this just follow me:
- Simply copy the following code (Html) to your Homepage,Blog,EMail or Website.
<iframe src="http://www.freeonlinegamesplay247.com/webmastercontent/fungames.php" style="border:0px #FFFFFF none;" border="0" name="FunGames Collection" scrolling="auto" frameborder="0" marginheight="0px" marginwidth="0px" height="700" width="600"></iframe>

Note: Edit the "height="700" and the "width="600" parameter to fit your personal needs.

How to Add Smileys/Emoticons in Blogger Comments

DKDE || blogpemula2019.blogspot.com || okysetyakelana.blogspot.com 

The Smileys/Emoticons way to give the visitors a lot of fun and confidence to your blog,It is known that these smileys used in social websites as Facebook.
To do this just follow the steps:

1.  Go to Blogger Dashboard  --> Template
2.  Please! download  a copy of your template
3.  Now click on Edit HTML
4.  Use Ctrl+F to find </body>
5.  Then copy and paste just  above/before it, this code:
<b:if cond='data:blog.pageType == "item"'>
<script type='text/javascript'>
//<![CDATA[
jQuery(document).ready(function () {emoticonx({
emoRange:"#comments p, div.emoWrap",
putEmoAbove:"iframe#comment-editor",
topText:"Click to see the code!",
emoMessage:"To insert emoticon you must added at least one space before the code."
})
});
//]]>
</script>
<script src='https://boyz.googlecode.com/svn/JS/emoticonnya.js' type='text/javascript'/>
</b:if>

Note: You can change blue with your own words.
6. Now the next step to find the code ]]></b:skin>
7. Then copy and paste just  above/before it, this code:
.emoWrap {
  position:relative;
  padding:10px;
  margin-bottom:7px;
  background:#fff;
/* IE10 Consumer Preview */
background-image: -ms-linear-gradient(right, #FFFFFF 0%, #FFF9F2 100%);
/* Mozilla Firefox */
background-image: -moz-linear-gradient(right, #FFFFFF 0%, #FFF9F2 100%);
/* Opera */
background-image: -o-linear-gradient(right, #FFFFFF 0%, #FFF9F2 100%);
/* Webkit (Safari/Chrome 10) */
background-image: -webkit-gradient(linear, right top, left top, color-stop(0, #FFFFFF), color-stop(1, #FFF9F2));
/* Webkit (Chrome 11+) */
background-image: -webkit-linear-gradient(right, #FFFFFF 0%, #FFF9F2 100%);
/* W3C Markup, IE10 Release Preview */
background-image: linear-gradient(to left, #FFFFFF 0%, #FFF9F2 100%);
  border:3px solid #860000;
  -moz-border-radius:5px;
  -webkit-border-radius:5px;
  border-radius:5px;
  box-shadow:0 4px 6px rgba(0,0,0,0.1),0 1px 1px rgba(0,0,0,0.3);
  -moz-box-shadow:0 4px 6px rgba(0,0,0,0.1),0 1px 1px rgba(0,0,0,0.3);
  -webkit-box-shadow:0 4px 6px rgba(0,0,0,0.1),0 1px 1px rgba(0,0,0,0.3);
  box-shadow:0 2px 6px rgba(0,0,0,0.1),0 1px 1px rgba(0,0,0,0.3);
  font-weight:normal;
  color:#333;
}
.emoWrap:after {
  content:"";
  position:absolute;
  bottom:-10px;
  left:10px;
  border-top:10px solid #860000;
  border-right:20px solid transparent;
  width:0;
  height:0;
  line-height:0;
}
8. Add the below code above/before </head>
<script src='https://ajax.googleapis.com/ajax/libs/jquery/1.8.3/jquery.min.js' type='text/javascript'/
9. Finally click save template.
Now you can see the result and be happy. :-d

Monday, July 15, 2013

How to Add Comment Box Below Your Posts in Blogger

DKDE || blogpemula2019.blogspot.com || okysetyakelana.blogspot.com 

Many bloggers and maybe you were looking at a way to add the comments box below your posts in Blogger, so I say to you in this tutorial we will learn create that through the very easy steps:

1. Go to Blogger Dashboard > Template.
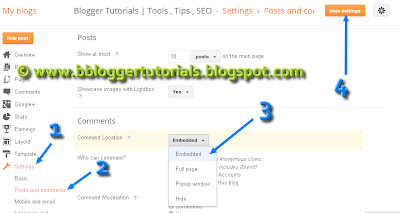
2. Go to "Setting"Posts and comments> we choose "Embedded" from comment location , then click on "Save settings".
That's all, Thanks for the follow-up.

Wednesday, July 10, 2013

How to Show Post Title Only on Home Page in Blogger

DKDE || blogpemula2019.blogspot.com || okysetyakelana.blogspot.com 

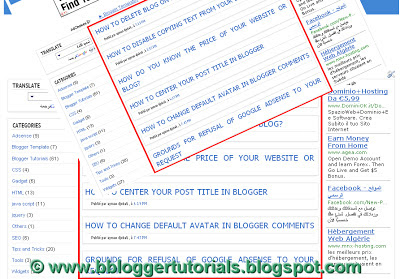
I will explain to you in this tutorial how to show post title only in the Home page in your blogger blog. this a simple code works on show titles only and is not a title and post together, where the title appears on the home page of the blog just by clicking on it redirects to the main post, and to be able to install this code in your blog, follow these simple steps:

1. Login to your Blogger Dashboard > Template
2. Download a copy of your template
3. Now click on Edit HTML

4. Use Ctrl + F to find </head> and paste the following code above/before it.
<style type='text/css'>

<b:if cond='data:blog.url == data:blog.homepageUrl'>

.post {
margin:.5em 0 1.5em;
border-bottom:0px dotted $bordercolor;
padding-bottom:1.0em;
height:50px;
}
.post h3 {
margin:.25em 0 0;
padding:0 0 4px;
font-size:20px;
font-family:Tahoma,Georgia,Century gothic,Arial,sans-serif;
font-weight:normal;
line-height:1.4em;
color:#cc6600;
}

.post h3 a, .post h3 a:visited, .post h3 strong {
display:block;
text-decoration:none;
color:#cc6600;
font-weight:normal;
}

.post h3 strong, .post h3 a:hover {color:#333333;}

.post-body {display:none;}
.post-footer {display:none;}
.comment-link {display:none;}
.post img {display:none;}
.post blockquote {display:none;}
.post blockquote p {display:none;}
h2.date-header {display:none;}
.post-labels {display:none;}
.post-rating {display:none;}

</b:if>

</style>
5. Finally, click on Save the template.
Enjoy and happy blogging! ;)

Search This Blog